General
Is it ok to pour water on the sauna stones?
Yes, it is. Just make sure the stones are hot before pouring water on them.
How do the safety distances work?
Important question! Each sauna heater has its own safety distances. Wood-burning stoves are connected to a smoke chimney, and it is important to observe the safety distances of the chimney as well. Chimney might require more space than the stove.
All this info can be found on the instruction manuals of the products.
What kind of sauna stones should be used?
There are several different stone types. We recommend olivine diabase or vulcanite stones. Small stones 5-10cm are good for electrical saun aheaters, and the 10-15cm stones are good for wood-burning sauna stoves.
How often should the stones be changed?
It really depends on the usage. If sauna is used 1-2 times per week, it would be good to change them once a year. Try picking up two stones and knock them on each other; if they crack, they should definitely be replaced.
Are your heaters really made in Finland?
Thanks for the question, someone from Narvi. Yes, they are :)
Can I just buy a sauna stove and start bathing?
You will at least need a smoke flue/chimney, and most likely other installation accessories as well. If electrical sauna heater, an electrician must connect the heater.
What wood can be burnt in the sauna stoves?
Any dry wood. We recommend birch, but any cleand and dry wood will do. Do not burn trash in the sauna stove.
Electrical heaters
Can I install an electrical sauna heater by myself?
The connection of an electrical sauna heater must be done by an qualified electrician.
Should electrical sauna heaters be connected to RCD?
According standard 60364-7-703 (Electrical installations of buildings) part 703.412.5, the sauna heater shall not be connected via residual current protective device (RCDs). Only a certified electrician is allowed to connect your electrical sauna heater.
Where should the thermostat be placed?
Thermostath should be place in the hottest part of the room. Our instructions say it should be 10cm down from the ceiling, above the heater.
Why does the control unit show different temperature than my thermometer on the wall?
Can the sauna control unit be installed inside the sauna?
Narvi Flow controllers can be inside or outside the sauna. Rest of the models could also be placed there, but operating with moist fingers might not be that smooth.
Controller shows the temperature of the area where the thermostat is place. It is most likely hotter above the heater than in the other parts of the sauna. For safety reasons, the thermostat must monitor the hottest part of the sauna.
Narvi Flow / Narvi Flow Wifi
What is the difference between Narvi Flow and Narvi Flow Wifi?
Narvi Flow is the “local” version, without Wifi controlling.
Narvi Flow Wifi has the remote functions, and the sauna heater can be operated via the Narvi Flow – app.
Is Narvi Flow something you need to buy separately, or is it inbuilt?
By inbuilt, we mean that the power card is installed inside the sauna heater, and the control unit + sensor are wired to the heater. Narvi Flow Wifi controller is inbuilt in following heater models:
Narvi NC electric Wifi
Narvi Saana Wifi
Narvi Smooth Wifi
Narvi Velvet electric Wifi
Narvi Ultra Small Wifi
Narvi Flow and Narvi Flow Wifi can be also bought separately. In that case, Narvi Flow includes the power card inside a plastic box, the control unit and temperature sensor. Narvi Flow Wifi has additionally wifi-function and a door sensor included.
Troubleshoot / Narvi Flow
The controller notifies: “Connection error: The connection to the mobile application was lost. Please try reconnecting your mobile device to the heater.”
The error message already tells you what to do, so it’s likely a recurring issue that the user hasn’t been able to solve. It is advisable to instruct the user to disable the phone’s Wi-Fi assistant. If it’s on, your phone can automatically switch to mobile data when the WiFi connection is weak. In iOS 26, this setting can be found in Settings > Cellular Data > Wi-Fi Assistant. A similar feature should also be found on Android.
The PIN is displayed on the controller screen, but the controller does not accept the PIN
If the PIN is entered correctly and the controller does not accept it, the connection between the phone and the controller is probably not working properly. The first thing you should do is check your phone to make sure that the phone in question is connected to the heater’s WiFi network. If so, the user should be asked to make sure that the Narvi Flow application has permission to search for other devices in the local network. In iOS 26, this setting can be found in Settings > Apps> Narvi Flow > LAN.
The user cannot connect the heater to the user’s own WiFi network, because the network is not shown in the list provided by the application
The signal to the WiFi access point is probably too weak. The user should make sure that the network is available on another device, and then try moving the WiFi access point closer to the controller. Once this is done, the linking should be restarted from the controller, as the controller will only scan for available networks when the hotspot is booted. It is also worth mentioning to the user that the controller only works on a 2.4GHz WiFi network (which is clearly the most commonly used, but someone may also have a 5GHz network in use).
The controller announces: “Network connection failed: Could not connect to WiFi.”t connect the heater to the user’s own WiFi network, because the network is not shown in the list provided by the application
This means that the device was unable to log in to the user’s own WiFi network. You should ask the user to check that they have selected the correct network and entered the password correctly. If it doesn’t help, you should check if you can connect to the network with other devices. If you can, you can try moving the WiFi access point closer to the controller so that the signal is strong enough. Restarting your WiFi access point can also help.
The controller reports: “Network connection failed: No IP address was obtained for the heater.”
This means that the controller was able to log into the WiFi access point, but it did not receive an IP address from the router. It is a good idea to ask the user to check the router to make sure that the DHCP server is in use. (The purpose of a DHCP server is to distribute IP addresses to devices as needed. If DHCP is not enabled, you must manually assign IP addresses to the devices. This is usually turned on by default in routers, so the user may well know what it is about if this problem occurs.)
The controller says: “Network connection failed: The server could not be reached.”
This means that the device got connected to the WiFi network, and the router gave it an IP address. The device then tried to connect to the internet but was unable to connect to the server. This may be because the server has been down for a while, in which case the user has no choice but to try again after a while. However, a more likely reason is that the user’s own internet connection does not work, which means that the device cannot theoretically connect to the server. In this situation, you can test yourself that the app can be used to control the heater connected to the production server. If it works, you should instruct the user to make sure that their Internet connection is working and that there are no settings related to the internal network that are preventing the controller from connecting to the Internet. Of course, a glitch in the user’s own network can also be temporary, so trying again after a while is a good idea anyway.
The controller says: “Network connection failed: The server did not confirm the link to the mobile application.”
This means that the user’s own network is working and the heater has been connected to the server. However, the server did not confirm the link to the application, which is most likely due to the message being lost on the way. The user should be instructed to try linking again.
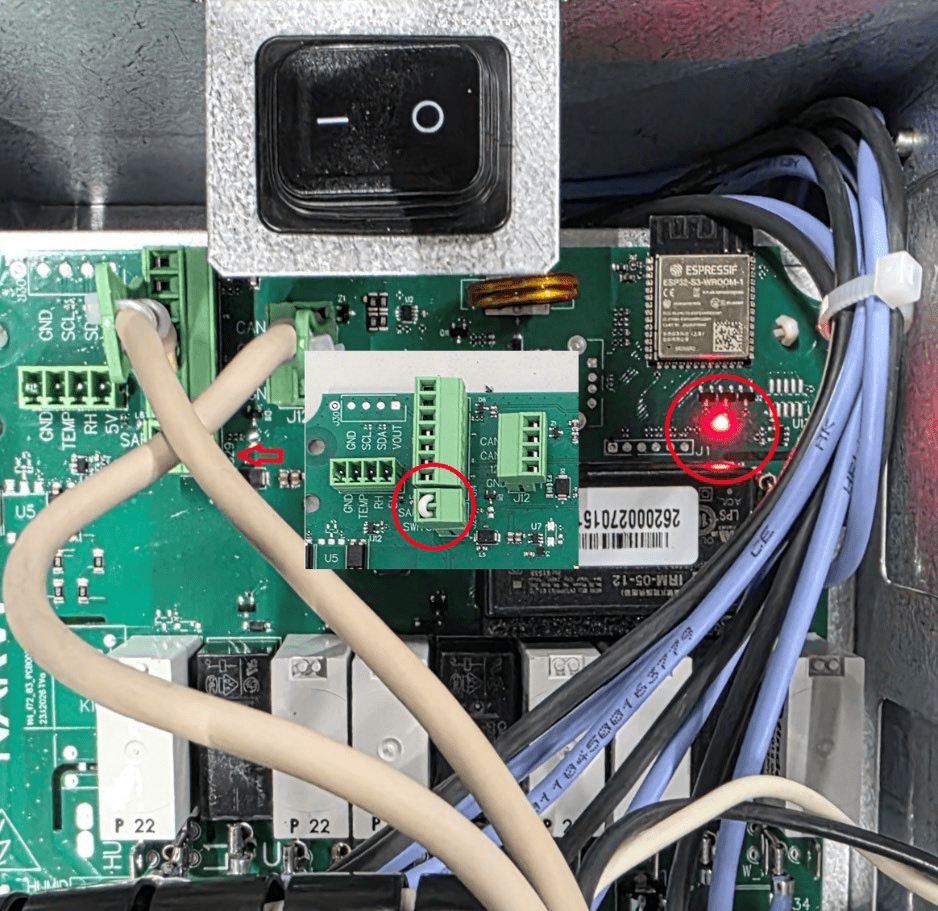
The controller is working, but the card won’t turn on the relays
Check that the red LED at the top right of the card is lit. If it doesn’t, then the short circuit loop in the 2-part green connector of the safety device is possibly loose from the screw connections/screw connection or the entire connector is not in place. In this case, the card refuses to work.